Uncategorized
How to Heal Blisters on Feet: An Athlete’s Step-by-Step Guide
Feb
You’re an athlete. You push your limits. But that single, painful blister has brought your training to a grinding halt. Now you’re sidelined, wondering if you should pop it, leave it, and how to get back on your feet without losing momentum. The uncertainty can be as frustrating as the pain itself. Knowing exactly how to heal blisters on feet isn’t just about first aid; it’s about reclaiming your power and protecting your performance.
Consider this your personal playbook for conquering foot blisters. In this guide, we’ll walk you through the safest, most effective steps to treat that painful spot, slash your recovery time, and eliminate the risk of infection. You’ll get the reliable, no-nonsense answers you need to get back to your sport, fast.
But we won’t stop at just healing. We’ll also arm you with an unbreakable defense strategy, your secret weapon to ensure blisters never sideline you again. It’s time to stop letting friction dictate your limits. Let’s get you healed, protected, and ready to unleash your full potential.
Key Takeaways
- Your first moves are critical. Learn how to assess a new blister to determine the right immediate action for faster, safer healing.
- Master the day-by-day process of how to heal blisters on feet. Proper dressing is your secret weapon against infection and setbacks.
- Stay in the game without causing more damage. Discover smart taping and padding strategies to protect your foot while you continue to train.
- Shift from treatment to total prevention. Build a bulletproof defense by systematically eliminating the friction that causes blisters in the first place.
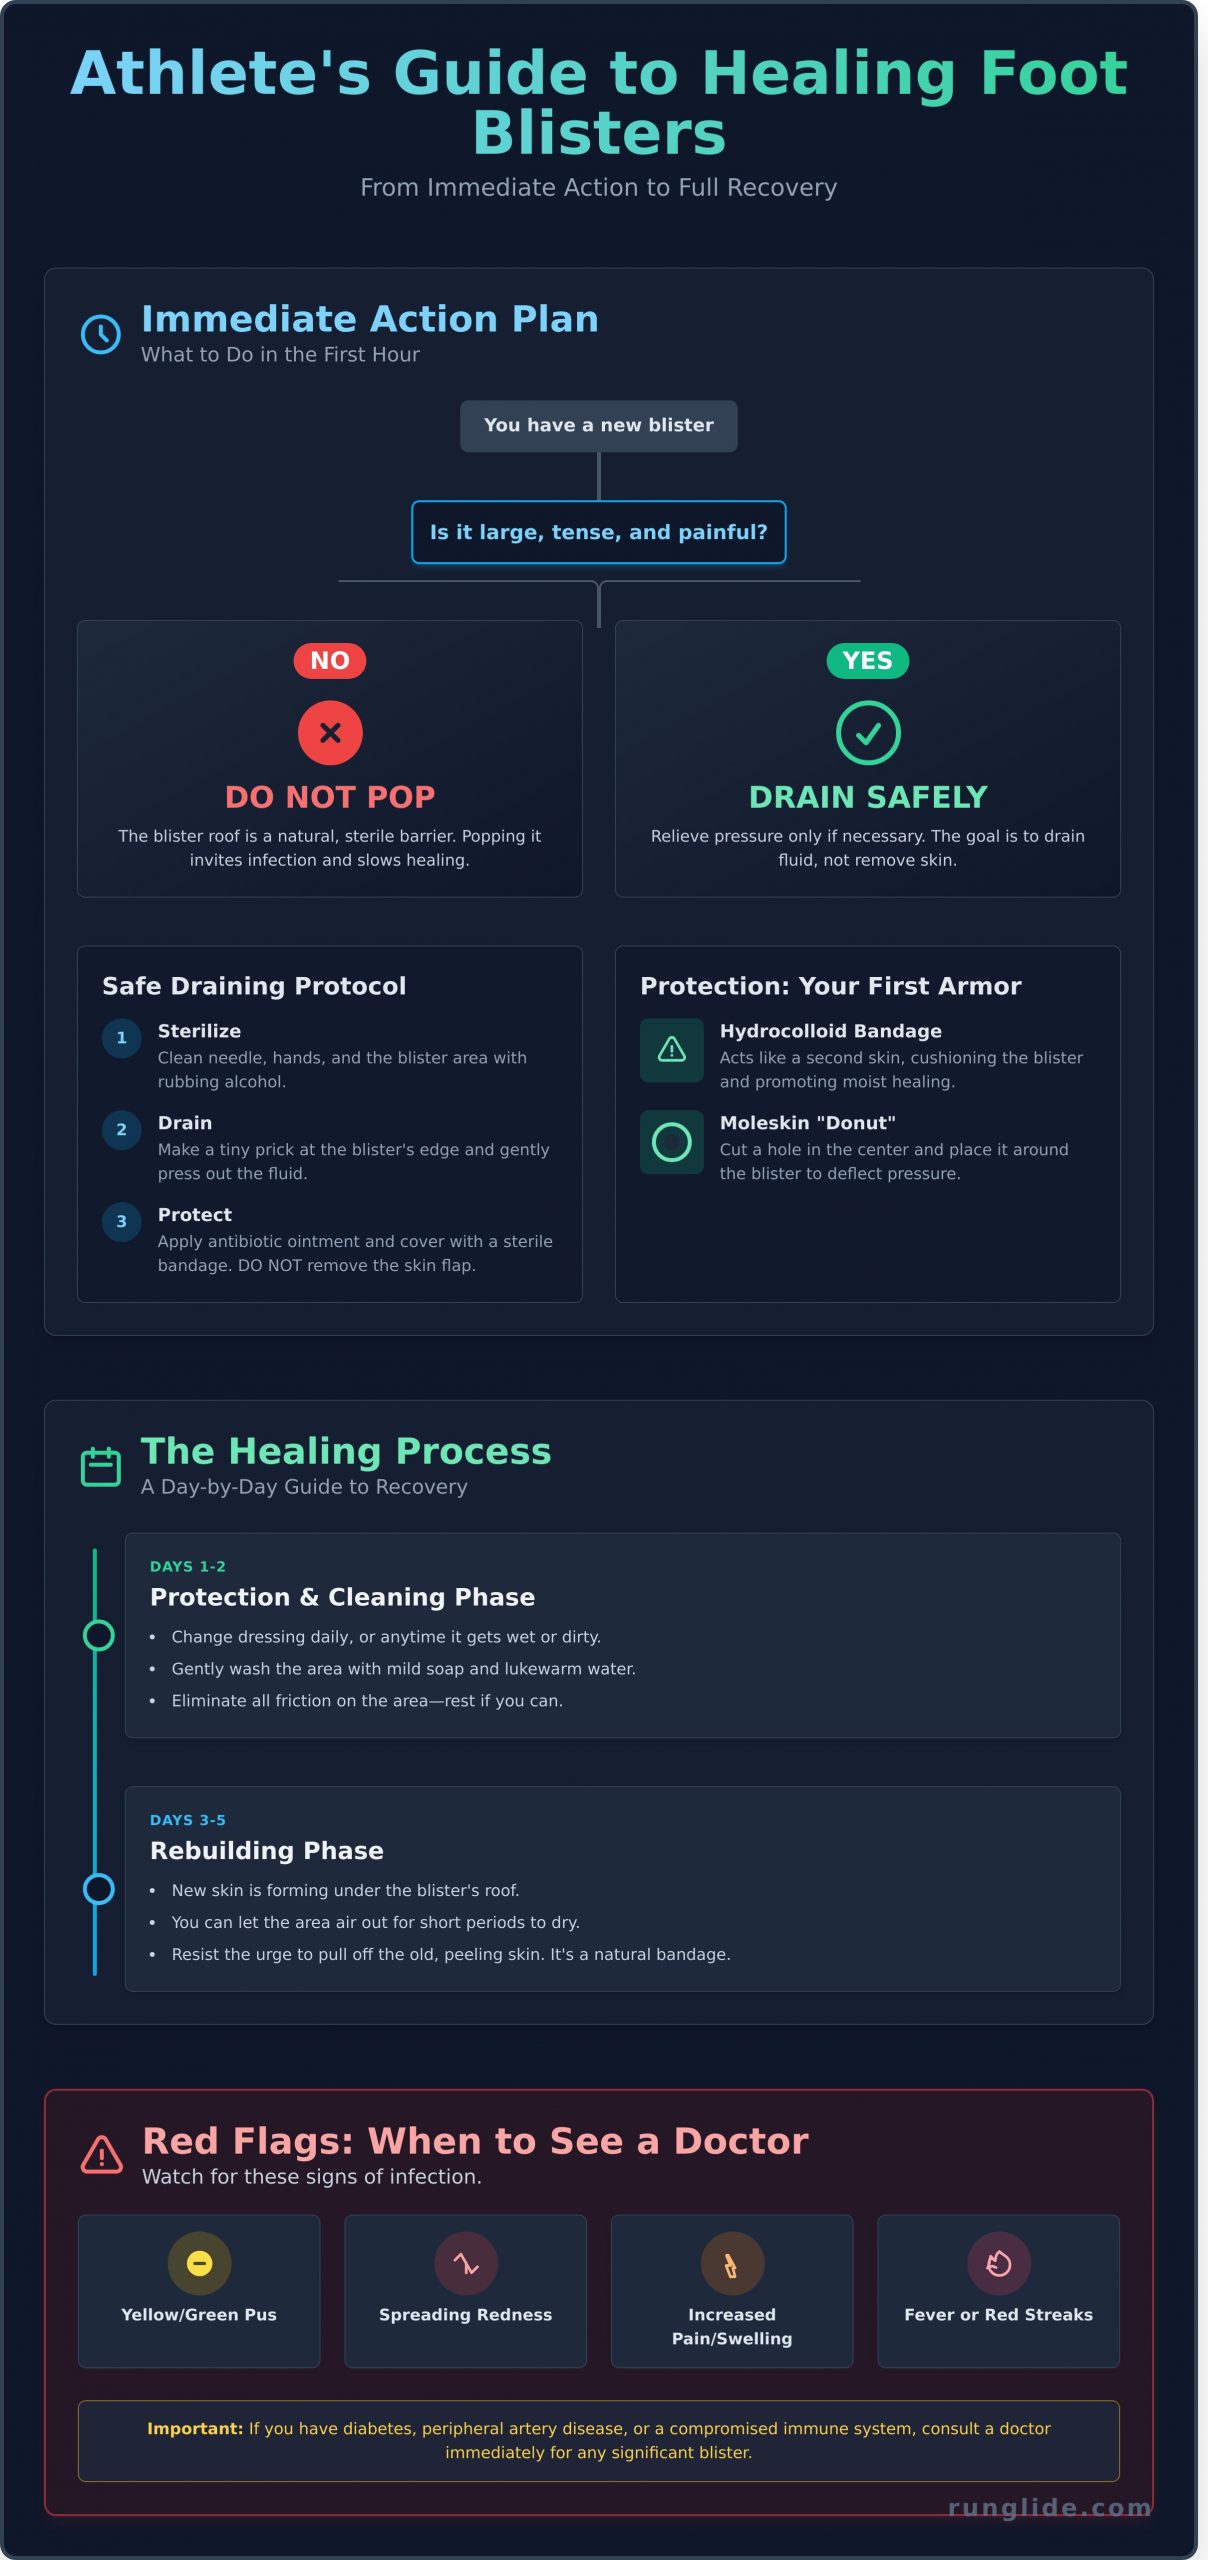
Your Immediate Action Plan: What to Do in the First Hour
You feel it—that dreaded hot spot has turned into a full-blown blister. Don’t let it derail your performance. Your first moves in the next 60 minutes are critical and will determine how fast you get back on your feet. The key to understanding how to heal blisters on feet quickly is to recognize that the blister’s roof is your body’s natural defense. This fluid-filled sac is a built-in cushion designed to protect the damaged skin underneath. To understand in detail what is a blister is to know that preserving this protective layer is your number one mission. This is your first-aid game plan for immediate relief and rapid recovery.
To Pop or Not to Pop? The Athlete’s Dilemma
The medical consensus is clear: leave small, intact blisters alone. That bubble of skin is a sterile, natural barrier, protecting the raw skin beneath it from bacteria and infection. Popping it for no reason is like tearing down your fortress walls—you invite in contaminants, increase pain, and significantly slow down the healing process. Your body knows what it’s doing. Trust the process and let it heal from the inside out.
How to Safely Drain a Blister (Only If Necessary)
Reserve this move only for large, tense, and painful blisters that are likely to burst on their own from continued pressure. If you must drain it, do it safely to prevent infection. Your goal is to relieve pressure, not remove the skin.
- Step 1: Sterilize your tools. Clean a small needle with rubbing alcohol. Then, wash your hands and gently clean the blister and surrounding skin with an alcohol wipe.
- Step 2: Carefully make a tiny prick at the very edge of the blister. Allow the fluid to drain out completely, applying gentle pressure if needed.
- Step 3: Do not remove the overlying skin. Apply an antibiotic ointment to the area and cover it with a sterile bandage.
Protecting the Area: Your First Layer of Armor
Whether you drained it or left it intact, the next step is protection. This is your invisible armor against further friction. Before applying anything, ensure the area is completely clean and dry. Cover the blister with a specialized hydrocolloid blister bandage, which acts like a second skin. Alternatively, create a “donut” by cutting a hole in the center of a piece of moleskin and placing it around the blister. This deflects pressure from the tender spot, allowing it to heal without irritation.
The Healing Process: A Day-by-Day Guide to Recovery
A blister is a setback, not a stop sign. Understanding the healing timeline is your secret weapon to manage expectations and get back to your peak performance without delay. Proper care in the first few days is your first line of defense, creating the perfect environment for your body’s natural repair crew to work its magic. Follow this guide to conquer recovery and return stronger than before.
Days 1-2: The Protection and Cleaning Phase
Your mission in the first 48 hours is simple: protect and clean. This initial stage is crucial for preventing infection and minimizing pain. Change the dressing or bandage at least once a day, or anytime it gets wet or dirty. When you do, gently wash the area with mild soap and lukewarm water—no harsh scrubbing. According to experts at the Cleveland Clinic, this simple cleansing is a core part of how to treat blisters at home and is non-negotiable for a fast recovery. Most importantly, eliminate any further friction. This might mean swapping shoes or taking a rest day. Give your skin the armor it needs to heal.
Days 3-5: The Rebuilding Phase
This is where you’ll see real progress. The initial fluid should be mostly reabsorbed by your body, and a new layer of skin is forming beneath the blister’s “roof.” You can now let the area air out for short periods to speed up drying, but keep it protected during activity. The old, outer layer of skin will start to look dry and may begin to peel. Resist the urge to pull it off; it’s a natural bandage protecting the sensitive new skin underneath.
Red Flags: When to See a Doctor
Your body is a powerful machine, but sometimes it needs professional support. The key to knowing how to heal blisters on feet safely is recognizing when to call for backup. Stay vigilant and contact a healthcare provider if you notice any signs of infection:
- Yellow or green pus draining from the blister.
- Redness that spreads away from the blister site.
- Increased swelling, warmth, or throbbing pain.
- A fever or red streaks leading away from the area.
If you have an underlying health condition like diabetes, peripheral artery disease, or a compromised immune system, don’t wait for red flags. Consult a doctor as soon as a significant blister forms to prevent serious complications.
Getting Back in the Game: How to Train with a Healing Blister
For a dedicated athlete, complete rest is the last thing on your mind. A blister doesn’t have to mean a full stop. The goal is to protect your foot, prevent the blister from worsening, and keep your momentum. It’s about training smarter, not just harder.
Remember, pain is your body’s non-negotiable signal to stop, not a challenge to push through. Listening to that signal is the first step in a powerful recovery that gets you back to peak performance faster. Here’s how you can stay active while giving your foot the protection it needs.
Smart Taping Techniques for Active Recovery
Your blister needs armor. The right taping technique creates a protective shield that absorbs pressure and reduces friction during movement. Before any activity, create a “donut” bandage with moleskin or use a hydrocolloid bandage to cover the area. Following established guidelines for first aid for foot blisters, the absolute rule is to ensure no adhesive touches the delicate blister roof. Secure the bandage with athletic tape, and for an extra layer of defense, apply an anti-blister balm like Runglide around the edges to reduce friction with your sock.
Modifying Your Workouts to Promote Healing
A key part of knowing how to heal blisters on feet is adapting your training to support the process. This isn’t a setback; it’s a strategic pivot. Give the high-impact exercises a temporary rest and channel your energy into workouts that keep you strong without punishing your feet.
- Swap for Low-Impact Cardio: Trade your run for a session in the pool, on a stationary bike, or using a rowing machine. You’ll maintain your cardiovascular fitness without the repetitive impact.
- Reduce Intensity and Duration: If you must stay on your feet, dial it back. Shorter, less intense workouts reduce the stress and friction on the healing skin.
- Focus on Strength: Use this time to conquer your upper body and core workouts. Planks, push-ups, and weight training can all be done without putting significant pressure on your feet.
This downtime is also a perfect opportunity to focus on overall muscle recovery. Using products from wellness-focused businesses like Lavender Life Company can help soothe tired muscles and make your rest days more effective.
The Ultimate Cure: A Bulletproof Blister Prevention Strategy
Knowing how to heal blisters on feet is a reactive skill every athlete learns. But the ultimate win isn’t healing fast—it’s never getting the blister in the first place. True performance freedom comes from prevention. The enemy is friction, and your mission is to systematically eliminate it with the right gear and preparation. It’s time to build your pre-run routine and create invisible, reliable armor for your feet.
Gear Check: Your Shoes and Socks Matter Most
Your first line of defense is what you wear. Start with your shoes, ensuring there’s a thumb’s width of space between your longest toe and the end of the shoe. Ditch cotton socks for good; they trap moisture and create a perfect environment for friction. Instead, choose synthetic, moisture-wicking materials. For long-distance runs or ultra-endurance events, consider double-layer socks to absorb even more friction.
Your Secret Weapon: The Power of Anti-Blister Balm
The game-changer for countless athletes is an anti-blister balm. This is your secret weapon, creating a durable, frictionless barrier on your skin that stops hot spots before they form. Unlike greasy petroleum jelly that wears off quickly, specialized balms are designed to last through sweat and miles. Simply apply it to your heels, toes, arches, and any other potential problem area before every workout. Find your perfect friction-fighting solution in the Runglide shop.
Your 2-Minute Pre-Workout Foot Prep Routine
This simple habit is the key to conquering blisters for good. Make it a non-negotiable part of your preparation, and you’ll stop worrying about how to heal blisters on feet and start focusing purely on your performance.
- Step 1: Start with clean and, most importantly, completely dry feet.
- Step 2: Generously apply your anti-blister balm to all potential hotspots. Don’t be shy.
- Step 3: Pull on your best pair of moisture-wicking performance socks.
That’s it. You’ve just armed your feet against the number one enemy of every athlete. Now, go unleash your potential.
Step Forward with Confidence
You now have the complete playbook for foot blister care, from immediate first aid to a safe return to training. Mastering how to heal blisters on feet is a two-part mission: first, taking swift, correct action to minimize pain and speed up recovery. Second, and most importantly, adopting a bulletproof prevention strategy to keep you in the game for good. While knowing how to treat a blister is a vital skill, the ultimate victory is making them a distant memory.
Don’t let preventable friction sideline your ambition. It’s time to stop reacting and start protecting. Trusted by runners, hikers, and elite athletes across the globe, Runglide is the secret weapon for conquering your goals. Its powerful, natural, and skin-safe formula provides an invisible layer of armor, creating a frictionless barrier between you and the irritation that holds you back. Unleash your true potential without fear of pain.
Build Your Blister-Proof Armor. Shop Runglide Now!
Your next personal best is waiting. Go conquer it, chafe-free.
Frequently Asked Questions
How long does it typically take for a foot blister to heal completely?
Most friction blisters heal within one to two weeks. The exact timeline depends on the blister’s size and how well you protect it. Keeping the area clean, dry, and shielded from further rubbing is your best strategy for a fast recovery. If the blister roof remains intact, your body’s natural healing process can work without interruption. Don’t let a small setback keep you from your goals.
What’s the difference between a regular friction blister and a blood blister?
A friction blister contains clear fluid and forms when the outer layer of skin separates from inner layers due to rubbing. It’s your body’s natural cushion. A blood blister looks dark red or purple because small blood vessels under the skin have broken from a pinch or impact, mixing blood with the blister fluid. Both require protection, but blood blisters can sometimes indicate more intense trauma to the area.
Why do I always get blisters in the exact same spot on my feet?
This is a classic “hot spot” issue. It means a specific point on your foot is enduring constant, targeted friction. This is usually caused by the fit of your shoe, a seam in your sock, or your unique foot mechanics during movement. Identify the source of the friction and you can conquer the problem. Think of it as a signal to adjust your gear or add protective armor, like an anti-chafe balm.
Can I still run a race if I have a blister?
Yes, you can often race with a blister, but only with the right protection. Your mission is to shield it completely. Use a high-quality blister bandage, like a hydrocolloid pad, to create a second skin that cushions and protects. Test it on a short, easy run before race day to ensure it stays in place. Listen to your body—if the pain is sharp or alters your form, it’s time to reconsider.
Are hydrocolloid blister bandages more effective than regular bandages?
Absolutely. Hydrocolloid bandages are your secret weapon. Unlike regular bandages, they create a moist, insulated healing environment that speeds up cell repair. They form a gel-like cushion over the wound, reducing pain and protecting it from friction far better than a simple adhesive strip. They are a game-changer when you need to heal blisters on your feet while staying active and pushing your limits.
Should I use Vaseline or petroleum jelly to prevent blisters?
While petroleum jelly can provide some lubrication in a pinch, it’s not the best long-term armor for an athlete. It’s greasy, can degrade the technical fibers in your socks, and often wears off too quickly during intense activity, leaving you unprotected. For reliable, sweat-resistant, and long-lasting defense, a purpose-built anti-chafe balm is the superior choice to keep you going for longer.
What are the first signs that a blister is getting infected?
Stay vigilant and watch for these key warning signs. An infected blister will show increased pain, swelling, and redness that spreads beyond the blister’s edge. You may also see yellowish or greenish pus instead of clear fluid, and the area might feel warm to the touch. If you notice any of these signs, it’s crucial to stop self-treating and seek advice from a medical professional immediately.